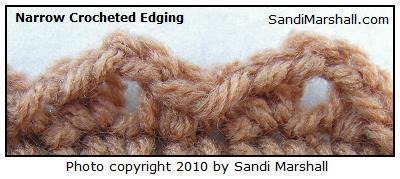
by Sandi Marshall
This example is made with yarn but you could use this same pattern with crochet thread and a hook size to correspond (such as crochet thread size 10 and a US size 7 or 8 steel hook) when thread will work better for the item being edged.
These directions are written in American English crochet pattern terms.
Abbreviations: ch = chain, sc = single crochet, sl st = slip stitch, st = stitch
Detailed Directions: Attach yarn, slip stitch in same place where yarn was attached, sc in next st, ch 2 (this will form a little bump), do not skip any stitches but sc in the next st (right after the one you had worked into before you made the ch 2), slip stitch in the next st (this pulls the sc just made a little sideways and brings this part of the edging very close to the item that the edging is being added to, forming a slightly scalloped look). Ok, that gives you a detailed description of the stitch sequence for this edging.
Now you will continue to repeat that same stitch sequence as follows:
* sc in next st, ch 2, sc in next st, sl st in next st **, repeat the directions between * and ** until you reach a corner.
Guidelines are given below for the corners. After working into a corner, continue in the regular stitch sequence along the next side. When you have gone all the way around, then end with a sl st in the first sl st that was made at the beginning. Then end off and weave in the ends.
For the corners:
If there are two stitches remaining before the corner, then sc in next st, ch 2, sc in next st, sl st in the corner.
If there are three stitches remaining before the corner, then sc in next st, ch 2, sc in next st, sl st in next st, (sc, ch 2, sc) all made in the corner.
If there is only one stitch remaining before the corner, then sc in that one stitch, ch 2, (sc, sl st) all made in the corner.
This is an edging that I thought up but it is so simple that other crocheters might think up something very similar on their own. I made this up as I went along for an edging on my Fun Shells Wide Stripes Throw and when that afghan was finished, I wrote out the directions for this edging, looking at the way I had crocheted the stitches. I’ve tried to explain it in such a way that it will be easy for you to recreate for crocheted items that you make. It would work well for an edging on many types of crocheted items.
You can get the free directions to crochet my Fun Shells Wide Stripes Throw Afghan on:
www.sandimarshall.com/fun-shells-wide-stripes-throw
Copyright: My written directions and my pattern photos are copyrighted and are not to be reproduced elsewhere without my permission. Instead, you may give the url for this pattern page to anyone that you think would like to have the pattern so that they may come to this site for themselves. You may link to this page, if you wish to (you don’t have to ask me if you can link to it, you can just go ahead and do it, so others can benefit from this pattern too).
Home Page: SandiMarshall.com


My cousin recommended this blog and she was totally right keep up the fantastic work!